ipManager
Table of Contents
Introduction
The ipManager is used to manage the settings for ipAttribute and ipRelease.
The ipManager interface is the controlling program where the user can setup output and reporting parameters. It is designed to be generic to all MSIP setups but it also acknowledges the individuality of different setups by allowing specific actions to be performed where required. The ipManager interface can be opened and viewed by all users but can be password protected to prevent accidental changes or deletion of sensitive data or parameters.
ipAttribute is designed to be run as an Autorun accumulation script in MSIP. It populates Attributes in the cut based on parameters set in the ipManager interface. Grades are automatically calculated for a cut as are tonnes and volume. Users can generate and calculate other Attributes based on cut or model parameters including Material Classing.
ipRelease is generally run manually once a cut or series of cuts have been generated. It can perform a number of functions including: Exporting Points, Polygons and solids to MineSight or 3rd party file formats; Generating MineSight labels for display and generating simple grade/tonnage reports on a cut by cut basis. ipRelease can also write attributes back to the grade control block model which is very useful for reconciliation purposes. The concept of release in MSIP-ARM is based on only exporting files or reports when the grade controller is ready, this will be explained in more detail later on.
Dependencies
Python: 2.5.[4-*]
MineSight 3D: 6.[10-*].*
MineSight Grail: 6.[10-*].*
Revision History
V1.0 Released March 2009
V1.1 Released May 2009 - Added multiple block model release - Store ini file in MSPD - Removed cutid - not required as it can be done in calculations area - Added seconds token - GUI upgrades - Two material attributes allowed - Released as pyz format
V1.2 Released June 2009 - Ability to run ipAttribute from Additional Scripts area - Altered date tokens - Added unique token - Added index token - Ability to run #eval and #exec statements from calculations area - Added ability to not automatically calculate reserves - Changed templates and reports tab to only be a templates tab - Added ability to run #eval statements from Templates area
V1.21 Released July 2009 - Added grd prefix to Grade items - Auto update of existing grade items in Material Classing - Modified Item Selection dialog in Material Classing section
V1.31 Released September 2009 - Added Custom Format - Added pointX, pointY, pointZ and pointSeq tokens - Fixed Crash when Report MSR's create labels > 255 characters in length - Script is now v5.00 Compatible - Material Class Grid is now reset when a new ini file is created
V1.33 Released August 2010 - Added Additional Attribution options
V1.35 Released December 2010 - Attribution portion released as standard with MS3D
V1.40 Released Sept 2012 - New checkbox in the 'Templates' panel to toggle auto-generation of the template sample - New checkbox in the calculation window to toggle auto-calcs
V1.50 Released June 2014 - Updated GUI to avoid wx grid errors in 64-bit. Using standard grail.mwx module as much as possible.
License Agreement
The Original Code is ipManager.py, ipAttribute.py, ipRelease.py, _ipCommon.py.
The Initial Developer of the Original Code is Leica Geosystems. Portions created by Leica Geosystems are Copyright (C) 2014 year. Leica Geosystems. All Rights Reserved.
ipManager
File
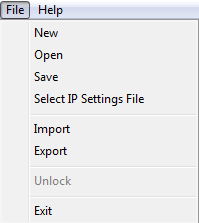
The File menu controls the ipManager ini file. This file stores the responses to each section of the ipManager program for future use. The ini file associated with an IP-Set can be stored in the database so that different IP-Sets can have different ini files in a single project.
| Option | Description |
|---|---|
| Open | Allows the user to Open an existing ini file. |
| Import | Allows the user to import an existing ini file into the current project. |
| Save | Allows the user to save the layout of the ipManager user interface to the ipManager.ini file. This is stored by default in the projects _msresourcessettings folder. |
| Select IP Settings File | It is possible to have more that one ini file in a single project so this option allows you to associate an IP-Set with an ini file. The ini file currently open for editing is listed at the bottom of the interface as is the ini file associated with the currently open IP-Set as a guide. |
| Import | Ini files can be imported into the ipManager inteface from external sources. |
| Export | Ini files can be exported to external locations and saved under a different name from the default. |
| Unlock | The ipManager user interface can be password protected to prevent accidental alteration of sensitive site parameters. To unlock the interface for editing the user must know the password and must enter it through this menu option. |
Available Tokens
Tokens are utilised on all three interface tabs and are the element that allows users to control the MSIP-ARM functions. The syntax of a token is standard Python syntax and must be followed exactly (including case) except for the "s" which can be substituted in numeric fields to define the number of floating points returned. eg.
%(TONNES)s = 19242.4115345 can be substituted for %(TONNES)0.2f = 19242.4
or
%(d)s = 6 can be substituted for %(d)02i = 06
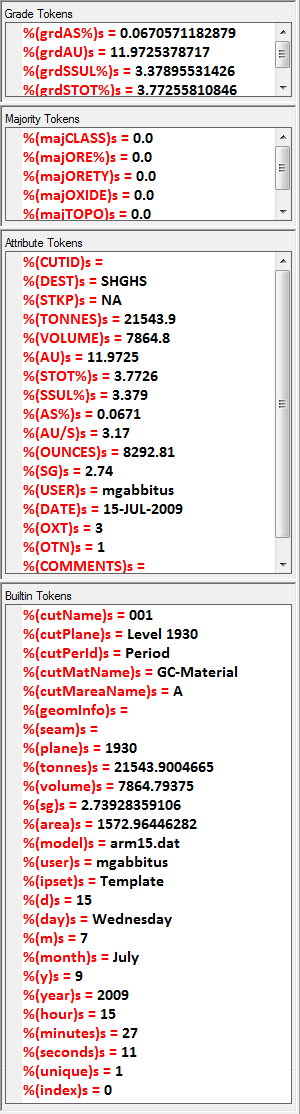
There are four segments to the Tokens view:
Grade Tokens
Grade Tokens are taken from the Area tab in the IP-Set and are calculated automatically. Grade Tokens have a 'grd' prefix to the item name for identification.
Majority Tokens
Majority Tokens are taken from the Block Model and include all items with an integer type. Majority items have a 'maj' prefix to the item name for identification.
Attribute Tokens
Attribute Tokens are user defined. It is strongly recommended that all user defined tokens are created in CAPITALS and that care is taken setting the Attribute Type and Validation rules as deleting an Attribute once cuts have been made can be problematic.
Builtin Tokens
Builtin Tokens are hardwired to the ipManager program and cannot be altered. They are always in lower case. Current Builtin Tokens are:
| Token | Meaning | Example |
|---|---|---|
| cutName | Cut name | 001 |
| cutPlane | Plane label | Level 1930 |
| cutPerId | Period ID | Period |
| cutMatName | Material set | GC-Material |
| cutMareaName | Mining area | A |
| geominfo | GSM seam name | Seams, S1-S2 |
| seam | Seam if a GSM model | SEAM1 |
| plane | Numeric part of plane label | 1930 |
| tonnes | MSIP calculated tonnes | 19242.4115345 |
| volume | MSIP calculated volume | 7022.31 |
| sg | tonnes/volume | 2.74018258017 |
| area | Planar area of the cut | 1404.50242539 |
| model | Reports the block model name used by the IP-Set | arm15.dat |
| user | User name from windows login | mgabbitus |
| ipset | IP-set name | template |
| d | Numeric day of the month | 15 |
| day | Alpha day | Wednesday |
| m | Numeric month of the year | 7 |
| month | Alpha month | July |
| y | Short year | 9 |
| year | Long year | 2009 |
| hour | Hour | 8 |
| minutes | Minute | 32 |
| seconds | Seconds | 4 |
| unique | Unique number generator | 1 |
| index | Index value of cut in the ipset | 0 |
| releaseIndex | Index value of cut within the released cuts | 0 |
| pointX | point X coordinate | |
| pointY | point Y coordinate | |
| pointZ | point Z coordinate | |
| pointSeq | unique point id |
The value shown next to a token shows either the values for the current cut, the first cut in the Cut list or a default value.
Note
Majority Tokens do not have a default value in the ipManager.
ipManager - Attribute

Description
The Attribute tab controls the actions of the ipAttribute program and any site specific attribution scripts that have been developed for an individual site.
Cut Calculations
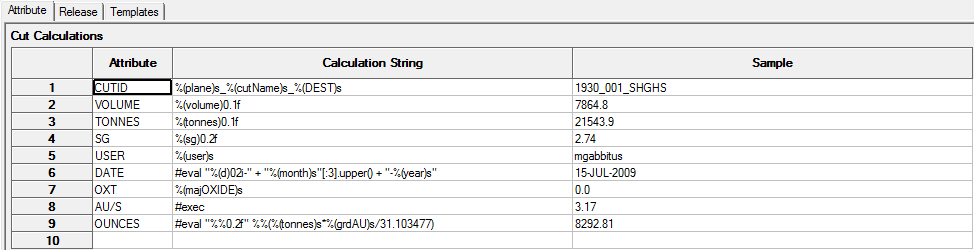
Users can setup calculations based on Available Tokens and constants and write the results back to user defined Attributes. The calculations are performed in a top down order so lower calculations can utilise the results of earlier calculations.
The calculation string can utilise internal () brackets and the standard + - / * symbols. Tokens must be written correctly utilising the Python %(xxxx)s syntax.
More complex calculations are possible in this section, through the use of #eval and #exec statements.
An #eval statement can be written on a single line whilst an #exec statement can be generated from a popup dialog box (right click in the calculation line). Both of these options require an understanding of Python. For more information please contact your local technical support office.
Example - Eval statement#1
This example converts the month token generated as lower case to upper case:
i.e. 05-January-2009 becomes 05-JAN-09
Example - Eval statement#2
This example calculates the cut ounces and returns the result to 2 decimal places:
Example - Exec statement
This example uses an if statement to get around 'division by zero' errors. Here we are working out a gold/sulphur ratio where sulphur could be zero the example also only generates the result to 2 decimal places:
gold= %(grdAU)s
sulphur = %(STOT%)s
if sulphur == 0.0:
result = 0.0
else:
result = "%%0.2f" %%(gold/ sulphur)
Material Classification
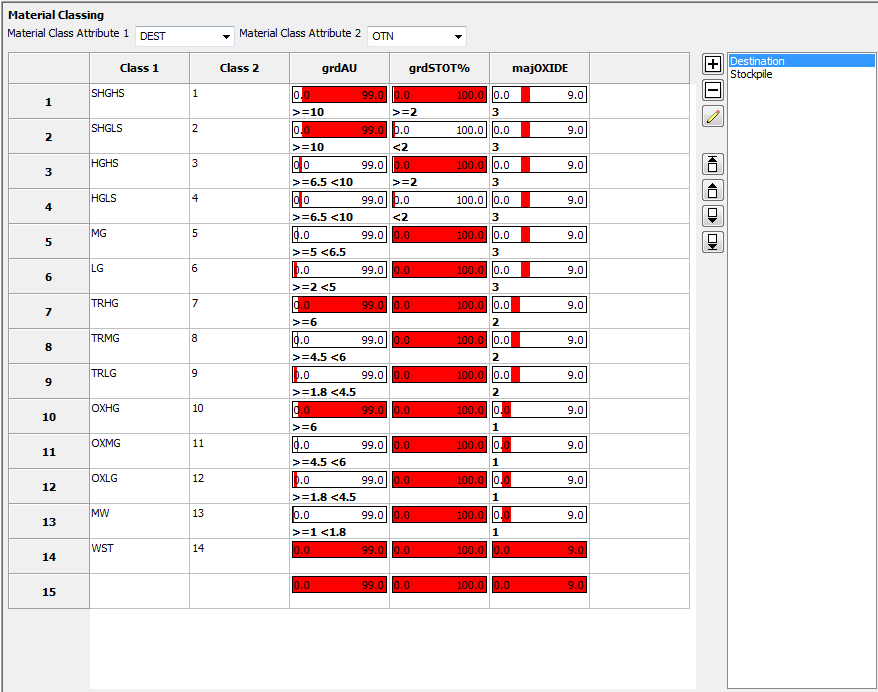
Multiple material classification for each cut can be generated using any of the available tokens. This classing can be written to two Attributes. The reason we allow two is so that you can generate an Alpha code for cut labelling and reporting while a Numeric code can also be generated for writing back to the Block Model.
These classification calculations can be very complex and it is important that no gaps are left otherwise material can be incorrectly classified. It is recommended that a 'DEF' or 'WASTE' type with no item limits is set as the last material any material that is classified as DEF or WASTE has slipped through the cracks and you must re-evaluate your settings.
Material Class templates are processed in the order defined in the list box, this allows clascification results to be used in subsequent classifications.
New items to classify by can be selected by double clicking in the grey header row. It is recomended that you select the %(grdAU)s item over the %(AU)s item in most situations though both will work.
Alpha items can be entered singularly or multiple values can be entered separated by a comma. Wildcards can also be used by using a *
Numeric items can ranged on, based on a single number or on a sequence of numbers (sequential or not). The syntax used is:
| Symbol | Meaning |
|---|---|
| = | Equals |
| > | Greater Than |
| < | Less Than |
| >= | Greater Than/Equal To |
| <= | Less Than/Equal To |
| - | Between (GELE) |
The range bar at the top of a numeric item class is based on the model items min/max values. The range selected for that item is shown by the red portion of the bar and is intended as a guide to aid generation of the classification index.
Site Specific Attribution
The MSIP-ARM suite are a generic series of grade control MSIP programs suitable for most operations. However it is understood that some sites and operations have very complex site specific requirements not done elsewhere.
Minesight Applications can develop custom scripts upon request please contact your local technical support office for more information.
Verbose Output
If this box is ticked then all attribution information is printed to the MS3D message window. This can slow down operation slightly but is a good audit tool as anything recorded in the message window is saved to the msAudit.txt file.
Disable Automatic Grades Attribution
The ipAttributer program can be used to perform calculations on all the cuts in an IP-Set if run from the Additional Scripts area (and no current cut). This is very useful when you want to update historical cut information however you may not want to attribute grade values (these are done automatically by default!). Ticking this box prevents this happening.
Activation
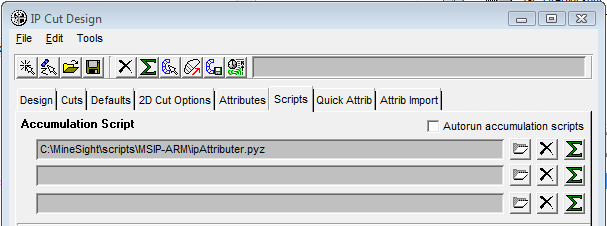
ipAttribute should be set as an accumulation script in the IP Cut Design panel, Scripts tab. It can be set as an Autorun script or manually activated. It can also be set as an Additional script to perform calculations on historical cuts. To utilise this secondary option:
- Setup a new ini file based on your calculations;
- Place the script in the Additional scripts area;
- Ensure that there is no current cut; and
- Run script.
Other
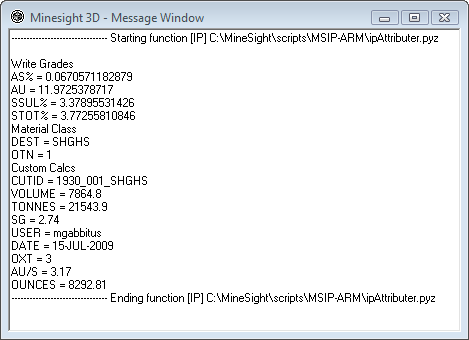
When run the ipAttribute script will write cut attributes to the Design tab and print them out to the MineSight 3D message window (if Verbose Output is ticked) along with any errors or warnings.
ipManager - Release

Description
The Release tab controls the actions of the ipAttribute program and any site specific attribution scripts that have been developed for an individual site.
Note
The concept of release in the MSIP-ARM scripts is based on only exporting specific files when the user wants to. In many cases a user will not want to export a file to a folder until they are confident that the cut is exactly right but they may wish to generate a report after each cut is made.
To control these actions the user must create a User attribute called RELEASE with validation values of:
- NO (default);
- YES; and
- DONE.
OR
- NO (default); and
- YES.
When a cut is made it has the default value of NO. If the users defines a particular release format (see below) as Release then when they run the ipRelease script nothing will happen until they manually alter the release value to YES.
If a release format is ticked to Release and the attribute is set to YES then the file will be released.
If the RELEASE attribute has three values (YES, NO and DONE) then once an object has been released it's attribute will be set to DONE.
If however the RELEASE attribute has two values (YES and NO) then the object will be released but the value will not be altered so it can be released again
If there is no RELEASE attribute or if the release format is not set to release then the file is generated every-time the release script is run. If there is no Release attribute but a format is ticked to release.
Release Formats
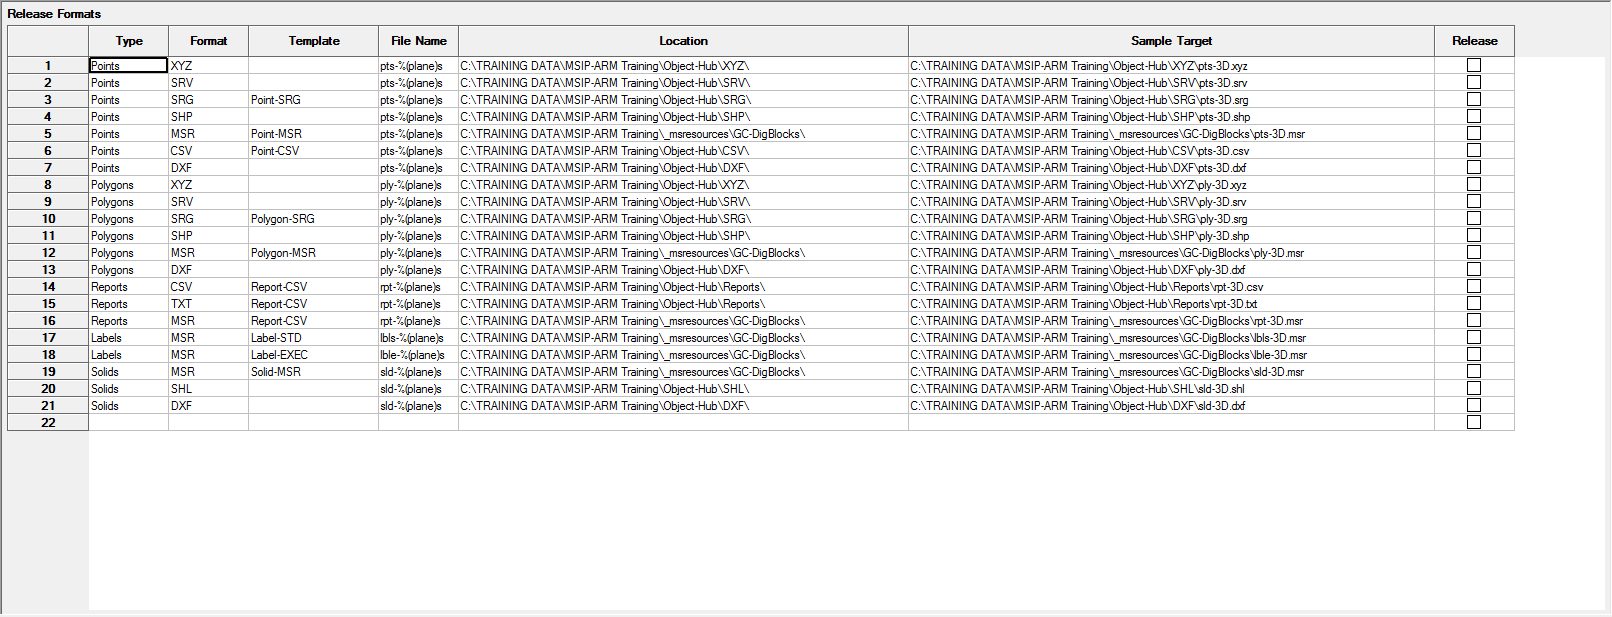
Type
The ipRelease program can generate four different types of files in a number of different formats. Through the use of tokens, file names and locations can be managed very effectively.
1. Points The points that make up the cut polygons can be exported for survey markout in a number of formats:
- XYZ
- SRV
- SRG
- SHP
- MSR
- CSV
- DXF
- Custom
The program only returns unique points. This removes many duplicate points where cuts are snapped together. The SRG, MSR, CSV and Custom formats can be enhanced with a Template (see below).
2. Polygons Cut Polygons can be exported for survey, display, plotting or to 3rd party applications such as Production Tracking systems. Polygons are currently exported in the following formats:
- XYZ
- SRV
- SRG
- SHP
- MSR
- DXF
- Custom
The SRG, MSR and Custom formats can be enhanced with a Template (see below).
Note
Custom formats are released with a .custom extension. This can be changed in the File Name column to be anything required i.e. .txt or .dat
3. Solids Cut Solids can be exported for survey, display, plotting or to a 3rd party application such as Production Tracking syetems. Solids are currently exported in the following formats:
- MSR
- SHL
- DXF
4. Labels Individual labels for each cut can be generated as MSR files. Multiple user defined templates can be created on the Template tab (see below) and exported to different folder locations for different users and plots.
Labels are generated at the cut center of mass.
5. Reports Multiple user defined reports based on tokens can be generated on the Templates tab (see below). Reports can be exported as:
- CSV
- TXT
- MSR
Format
The format drop down list changes based on the Type selected.
Template
This refers to a template setup in the Template tab (see below).
File Name
The file name of exported Points, Polygons, Labels and Reports can be defined by constant text values mixed with tokens, this enables users to define unique file names for each export.
Location
The location where the exported file is stored can be based on existing file locations mixed with tokens. If tokens are used then new folders (if required) will be generated on the fly. To browse for a particular folder location right-click in the text box. Standard Ctrl-C and Ctrl-V key commands can be used to copy and paste from line to line.
Sample Target
Provides an example of the folder location and file name that will be generated at release.
Release
The release tick box can be set for each individual export and relates to the RELEASE attribute if it exists. If un-ticked the export occurs each time the ipRelease script is run otherwise it follows the concept of release outlined above.
Write Attribute to Block Model

It is possible to write multiple attribute values back to the blocks encompassed by the cut. The attribute must be numeric and the item in the block model must have min/max and precision values capable of storing the value being exported.
The user can define the percentage of a block that must be inside the cut before it is written to, by default this value is 50%.
Attribution can be controlled by the release concept via the tick box.
Site Specific Release
The MSIP-ARM suite are a generic series of grade control MSIP programs suitable for most operations. However it is understood that some sites and operations have very complex site specific requirements not done elsewhere.
MineSight can develop custom scripts upon request please contact your local technical support office for more information.
Verbose Output
If this box is ticked then all release information is printed to the MS3D message window. This can slow down operation slightly but is a good audit tool as anything recorded in the message window is saved to the msAudit.txt file.
ipManager - Templates

Description
The Templates tab enables users to define multiple templates for labels and reports, point file exports and polygon exports. The release and use of these templates is controlled on the Release tab (see above).
Template
A new Template can be generated by selecting the + button and entering a name. A Template can be deleted by selecting a template from the dropdown list and pressing the - button. A Template can be modified by selecting it from the dropdown list.
Material
If a file is being released as an MSR file then it is possible to assign a Material to the element. Materials must exist in the _msresources/Material folder if they are to be used.
A single Material type can be applied to all objects or you can use a Token to assign a material based on an attribute value i.e.
Example 1 - Releasing Block Labels to MS3D for Plotting
Generally you will want your block labels to all be coloured the same for plotting. If this is the case then you can setup a Material called iplabel and set the colour and label size parameters to your desired values. If you intend making plots at different scales then it is a good idea to make several iplabel Materials with different label sizes.
Example 2 - Releasing Block Polygons to MS3D for Plotting
When releasing blocks as MS3D polygons for plotting you will generally want to colour the blocks based on an attribute like oretype or destination generated by the Material Classing option. You will need to make Materials based on the Classing code (i.e. HG, MG, LG) and then select the Classing Token from the Material dropdown (i.e. %(DEST)s).
Sample Report
The Sample Report button allows you to see a true representation of how the report will look with multiple blocks reported.
Template Definition
This is the window where you type in the layout of your Template using text and Tokens. Depending on the type of file you intend your Template to be used for releasing you can enter in a number of different formats.
Example 1 - Releasing a Point File with SRG Format
SRG Format allows you to export points in a comma delimited format and add extra columns of information to the file. The default columns are X,Y,Z,Pt#. By setting up a template like:
%(CUTID)s,%(TONNES)0i,%(user)sYou can get a file like this for a single polygons points:
16276.678,11191.750,3452.500,1,3452.5_HGOX_005,1776,mgabbitus
16256.703,11202.712,3452.500,1,3452.5_HGOX_005,1776,mgabbitus
16255.415,11215.609,3452.500,1,3452.5_HGOX_005,1776,mgabbitus
16267.013,11205.291,3452.500,1,3452.5_HGOX_005,1776,mgabbitus
16280.544,11201.422,3452.500,1,3452.5_HGOX_005,1776,mgabbitus
16285.055,11191.104,3452.500,1,3452.5_HGOX_005,1776,mgabbitus
Note
SRG point files do not have unique point numbers, see the CSV output option if you require unique point numbers
Example 2 - Releasing Points to an MSR file
If you want points in an MSR to have an Element Name and Material attributed to them you must set up a simple template. The template requires a Material (i.e. %(DEST)s) and at least a single value or Token in the Template Definition window. If you enter more than one value or Token then the resultant values will be concatenated to form a single Element Name String. The most commonly used Token used here would be the %(unique)s Token that will element attribute each point with a unique point number.
Example 3 - Releasing Points to a CSV file
The CSV file format in MSIP-ARM is a special format designed for Surveyors. If the file is output without a Template the default columns are X,Y,Z,Pt#. The major difference between this file and the SRG file is that all of the Point Numbers are unique! By adding a template you can add extra columns like the SRG report.
Example 4 - Releasing Polygons with SRG Format
As With Example 1 you can export a polygon in a comma delimited format and exra columns of information to the file. Unlike an SRG file of points each point in a polygon is given a unique number reference. A template written in the same format as a Point to SRG release can be used.
Example 5 - Releasing Polygons with Custom Format
The Custom format mixed with the Polygon Type is most useful for creating point files with a user defined layout. We use the Polygon Type so that you can get a unique point number for each point in the polygon (including the repeat point in a polygon). It is important to remember that the template must end with an Enter otherwise all the information will be printed to the same single line, i.e:
%(pointX)s,%(pointY)s,%(pointZ)s,%(pointSeq)s,%(CUTID)s
Example 6 - Releasing Polygons to an MSR file
Polygons can be exported to an MSR for plotting and attributed with a Material type based on a Token (i.e. $(DEST)s). The Material to be used must be setup as a Template. With the Template it is also possible to use a value or Token to set the Element name of the Polygons (i.e. $(CUTID)s)
Example 7 - Releasing Cut Labels
Cut Labels can be generated as MSR files for Plotting and multiple Templates can be set up for this purpose, for example a detailed label with grade information for the grade controllers and a less detailed label with Tonnes and Destination information for production staff. Label Templates can occupy multiple rows. As you enter your label template information in the Template Definition window an example of the label will be generated in the Template Sample window:
%(CUTID)s
%(TONNES)s
%(grdAU)0.2f
%(grdSTOT%)0.2f
Would give you something like:
1930_003_SHGHS
22029.0
12.03
3.82
You can even add in some text such as "t" or "g/t" at the end of the definition row to give you output like:
%(CUTID)s
%(TONNES)s t
%(grdAU)0.2f g/t
%(grdSTOT%)0.2f %
Would give you something like:
1930_003_SHGHS 22029.0 t 12.03 g/t 3.82 %
Example 8 - Altering a label with an #exec statement
It is possible to use #exec statements in the Template Definition window to alter the look of a label. In the following example we are going to add a comma to Tonne values over 1000. This is done using a Python module called 'locale', i.e:
import locale
tonnes = locale.format ("%%i", %(TONNES)s, True) + " t"
sulphur = "%(grdSTOT%)0.2f %%"
result = '''%(CUTID)s
%%s
%(grdAU)0.2f g/t
%%s''' %(tonnes,sulphur)
Would give you:
1930_003_SHGHS
22,029 t
12.03 g/t
3.82 %
Example 9 - Releasing Reports
Reports based on cuts in the IP-Set can be generated as CSV, TXT or MSR format files. The same Template can be used for all formats or multiple Templates can be generated and used. The Template for a Report is generally written on a single row (as if you were writing out the file header line) and uses Tokens to generate the cell values. The Header name can be overwritten by using the HeaderFooter button (see above). A Sample report can be generated by selecting the Sample Report button (see above). Reports can be released as MSR files for plotting and it is recomended that a pre-built Material is made that sets the label font, size and colour.
Entering a Template format like:
%(CUTID)s,%(TONNES)s,%(grdAU)0.2f,%(grdSTOT%)0.2f,%(grdAS%)0.2f,%(OUNCES)s,%(DEST)s,%(model)sWould produce a Report like:
CUTID,TONNES,GOLD,SULPHUR,ARSENIC,OUNCES,DEST,BM
3D_006_LG,4140.0,3.83,4.03,0.00,509.36,LG,arm15.dat
1930_003_SHGHS,22029.0,12.03,3.82,0.06,8519.22,SHGHS,arm15.dat
1930_004_HGHS,11607.1,9.35,3.94,0.15,3489.65,HGHS,arm15.dat
3.0,37776.1,10.31,3.88,0.08,12518.23,HGHS,
The first line is the header line and the last line is the footer showing the cut count, sum of tonnes, MWA grades, sum of ounces and the majority Destination..
Note
Reports plotted to MSR should use either Stroked or Courier New font otherwise the report may not line up correctly
Example 10 - Releasing Solids to an MSR file
In much the same way as Points and Polygons, it is possible to Release Solids as an MSR file. A Template can be applied to attribute the Solids with Material and Element name information.
Activation
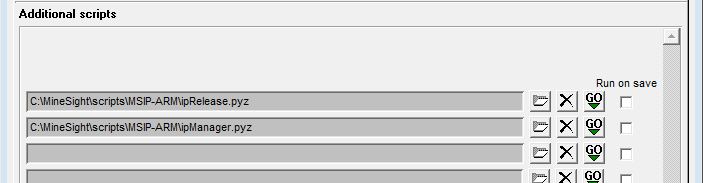
ipRelease should be set as an additional script in the IP Cut Design panel, Scripts tab. It can be set to run on Save or manually activated.
Other
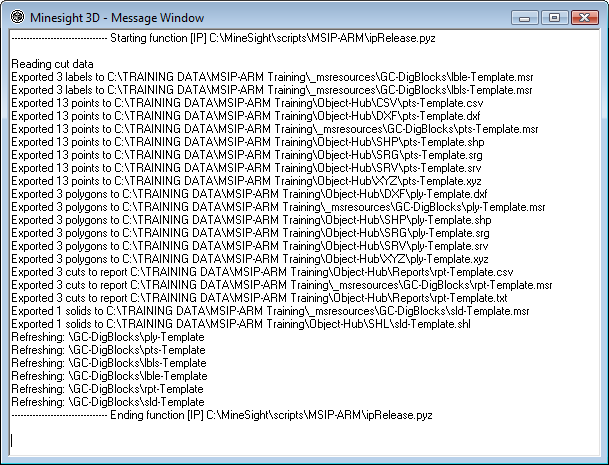
When run the ipRelease script will generate multiple files and save them to the defined locations. It will also print a report to the MineSight 3D message window (if Verbose Output is ticked) along with any errors or warnings.